How to Document Property Condition Before and After Cleaning
When it comes to maintaining properties, keeping track of their condition before and after cleaning is essential. Proper documentation not only helps you evaluate the effectiveness of your cleaning practices but also serves as valuable evidence in case of disputes or inquiries. Here’s a detailed guide on how to document property condition thoroughly and effectively.
Start with a Checklist
Creating a comprehensive checklist is your first step. This list should cover all areas of the property. Consider including the following:
- Exterior surfaces (walls, roofs, driveways)
- Landscaping and garden areas
- Interior spaces (kitchen, bathrooms, living rooms)
- Windows and doors
- Flooring materials (carpet, tile, hardwood)
By listing all the areas, you ensure that nothing is overlooked during your documentation.
Photographic Evidence
One of the most effective ways to document the condition of a property is through photographs. Follow these guidelines:
- Use Consistent Angles: Take photos from the same angles both before and after cleaning. This will give a clear view of the improvements made.
- High-Quality Images: Use a good camera or smartphone to capture high-resolution images. Blurry or dark photos can misrepresent the actual conditions.
- Detailed Focus: Capture specific issues like stains, dirt, and damage. This highlights the areas that needed attention.
By having a visual record, you create a compelling narrative that showcases the property’s transformation.
Written Documentation
Alongside photographs, written documentation is crucial. Consider the following:
- Date of Cleaning: Note the specific date when the cleaning took place.
- Condition Descriptions: Write detailed descriptions of each area. For example, mention if a surface was particularly dirty or had specific stains.
- Actions Taken: Document what cleaning methods and products were used. This can include vacuuming, mopping, pressure washing, etc.
This written content complements the photos and provides a complete picture of the property’s condition.
Utilizing Digital Tools
In today’s digital world, using apps and software for documentation can simplify your process. Consider these options:
- Cloud Storage: Use services like Google Drive or Dropbox to store your photos and documents. This keeps everything organized and accessible.
- Property Management Software: Tools like Buildium or Apartment.com offer features for managing property conditions and cleaning history.
- Mobile Apps: Apps like Evernote or Notion allow you to combine notes, images, and checklists in one place.
Taking advantage of digital tools ensures your documents are not only organized but also easy to share when needed.
Review and Compare
Once the cleaning is complete, organize your documents for easy comparison:
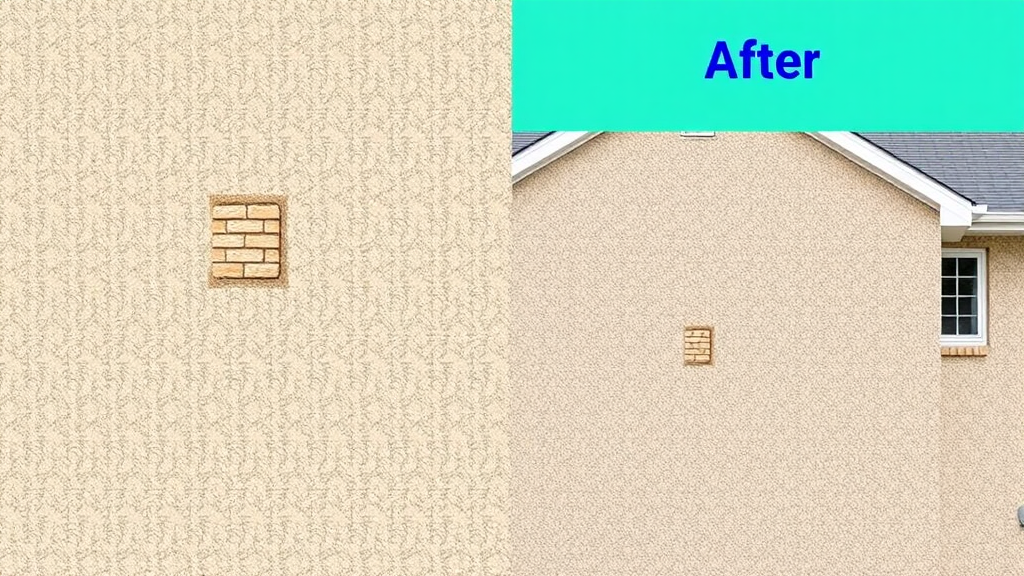
- Lay out the before and after photos side by side.
- Match your written descriptions with the corresponding images.
- Highlight key areas where significant improvements were made.
This step is crucial for evaluating the cleaning effectiveness and setting benchmarks for future cleanings.
Keeping Records
Keeping a record of property conditions is beneficial for various reasons:
- Track cleaning effectiveness over time.
- Provide documentation for rental agreements or sales transactions.
- Assist with maintenance schedules and budgeting for future cleaning activities.
Ultimately, thorough documentation will not only improve your cleaning practices but can serve as a powerful part of your property management strategy.
For more insights on property management and cleaning techniques, visit The Balance SMB or Property Manager Blog.
Essential Tools for Effective Property Documentation
Documenting the condition of a property is crucial for many reasons, such as ensuring maintenance, managing rental properties, and protecting your investment. Whether you’re a landlord, real estate agent, or homeowner, understanding the essential tools for effective property documentation will streamline the process and enhance your overall efficiency.
Camera or Smartphone
A quality camera or a smartphone with a good camera is one of the most important tools for property documentation. Here’s why:
- High-resolution images help capture minute details.
- Easy to use and portable; you can document different areas quickly.
- Allows for photo editing to highlight specific features.
Property Condition Report Templates
Using a property condition report template can simplify documentation:
- Standardizes your reporting, making it easier to compare conditions over time.
- Ensures you cover all critical areas, such as rooms, features, and outdoor spaces.
- Templates can often be customized according to specific needs.
Digital Documentation Software
Investing in digital documentation software adds another level of professionalism:
- Many software options allow you to include photos, notes, and sketches.
- Sharing reports with stakeholders becomes seamless.
- Some platforms allow for cloud storage, reducing the risk of data loss.
Measuring Tools
Accurate measurements are vital for a comprehensive understanding of property condition:
- A digital tape measure or laser measuring tool allows for precise measurements of rooms and spaces.
- Knowing the dimensions helps when estimating repairs and renovations.
- Knowing floor space can be advantageous during property appraisals.
Notebook or Digital Note-taking Apps
Taking notes is an essential part of property documentation:
- Jotting down specific issues or observations ensures you don’t forget them later.
- Digital note-taking apps can sync across devices, making information accessible anywhere.
Inspection Tools
Inspection tools can help identify areas needing attention:
- A flashlight is necessary to check dark corners and under furniture.
- Moisture meters help identify potential water damage or mold.
- Basic repair tools can assist in temporarily fixing minor issues for photography.
Environmental Sensors
To ensure a comprehensive assessment, consider including environmental sensors:
- Air quality sensors can help identify indoor pollutants, essential for health and safety.
- Temperature and humidity monitors can point to issues in damp areas.
Inventory Management Apps
Managing your property’s contents is also part of documentation:
- Apps can help track appliances, furniture, and other assets within the property.
- Creating an inventory can come in handy during insurance claims.
Organization and Storage Systems
Establishing a good organization and storage system is vital:
- Utilizing folders or binders for physical documents keeps your reports organized.
- Cloud-based storage ensures that all documentation is safe and retrievable.
By employing these essential tools, you’ll be well on your way to documenting property conditions effectively. Each piece of equipment or software plays a critical role in making your documentation accurate and manageable. For more insights on property documentation tools, you can visit Apartment Therapy or National Association of Realtors.
When you document properties before and after cleaning, you establish a baseline. This not only facilitates better maintenance plans but also clarifies the condition for potential buyers or renters. Make sure to conduct documentation with attention to detail and a clear strategy in mind to maximize the benefits of your efforts.
Best Practices for Taking Before and After Photos
Capturing before and after photos is a powerful way to document the condition of a property, especially in cleaning or restoration tasks. These images are not only helpful for your records but also serve as marketing material. Here are some best practices for taking effective before and after photos.
Lighting is Key
Good lighting can make a significant difference in the quality of your photos. Natural light works best, as it highlights the details of the space. Here are some tips:
- Use natural light: Open windows and doors to let in as much light as possible.
- Avoid harsh shadows: Take photos during the golden hour, which is early morning or late afternoon when the light is softer.
- Turn on lights: If natural light isn’t available, ensure all overhead lights are switched on to brighten up the space.
Choose the Right Angles
Capturing the right angle can dramatically affect how your before and after photos look. Here are some angles to consider:
- Eye level: Take photos at eye level to give viewers a natural perspective.
- Wide-angled shots: Use wide-angle shots to capture as much of the space as possible.
- Detail shots: Focus on specific areas of interest or problems, like stains or damages, to illustrate your point.
Consistency is Crucial
To clearly show the transformation, consistency in your photography is essential. Here’s how you can maintain consistency:
- Same location: Ensure both before and after photos are taken from the same spot.
- Same time of day: Try to shoot your photos at the same time to maintain consistent lighting.
- Camera settings: Use the same camera settings such as exposure, focus, and white balance.
Use a High-Quality Camera
The quality of your camera can directly impact the clarity of your photos. Whether you’re using a professional camera or a smartphone, keep these tips in mind:
- Clean your lens: Always make sure your camera lens is free from smudges and dust.
- Steady your shot: Use a tripod or keep your hands steady to avoid blurry images.
- Utilize features: Take advantage of features like HDR (High Dynamic Range) for better detail in both highlights and shadows.
Editing for Clarity
Editing your photos can help bring out the best aspects and clearly highlight the differences. Here are some tips for editing:
- Adjust brightness and contrast: Make sure your images are bright enough but not washed out.
- Crop wisely: Trim any unnecessary parts of the image that don’t add value.
- Maintain realism: Avoid over-editing; you want the after photos to look real, not artificially altered.
Capturing Details
Don’t forget to capture specific details that illustrate the property’s condition. Consider the following:
- Close-ups of problem areas: If there are stains or damages, get close-up shots before and after cleaning or repairing.
- Environment context: Include surrounding areas to provide a full picture of the property’s condition.
Using Your Photos Effectively
Once you have your before and after photos, make the most out of them:
- Social media sharing: Share your transformation photos on platforms like Instagram or Facebook to attract attention.
- Client portfolios: Include the photos in your client presentations to showcase your work.
- Website updates: Keep your website updated with the latest transformations to demonstrate your services.
For more insights on photography for real estate or property management, you can visit Property Management Insider or explore resources at Photography Tips.
By following these best practices, you’ll be able to create compelling before and after photos that not only document property conditions effectively but also serve as powerful marketing tools.
Creating a Comprehensive Cleaning Checklist
Creating a cleaning checklist is an essential step for anyone looking to maintain a tidy home or workspace. It ensures that you do not overlook important tasks, making your cleaning routine more streamlined and efficient. Here’s how to develop a detailed and comprehensive cleaning checklist.
Understand the Areas You Need to Clean
The first step in crafting a robust cleaning checklist is identifying the different areas that require attention. Break your cleaning tasks down by room or area, which allows for manageable chunks of work. Common areas that need to be included are:
- Living room
- Kitchen
- Bathrooms
- Bedrooms
- Hallways and entryways
- Outdoor spaces
List Essential Cleaning Tasks
Once you’ve identified the areas, the next step is to list the essential tasks that need to be completed in each one. Here’s an example checklist:
| Room | Tasks |
|---|---|
| Living Room |
|
| Kitchen |
|
| Bathrooms |
|
| Bedrooms |
|
Frequency of Tasks
When creating your checklist, consider how often you need to perform each task. Some tasks may need daily attention, while others might be done weekly or monthly. Here’s a sample frequency guide you might find helpful:
- Daily: Dishes, tidying up, sweeping floors
- Weekly: Vacuuming, dusting surfaces, changing linens
- Monthly: Deep cleaning appliances, washing curtains, organizing closets
Utilize Digital Tools
In today’s digital age, using apps can simplify managing your cleaning checklist. Various applications allow you to organize tasks, set reminders, and even share checklists with family members or roommates. Tools such as Trello or Todoist can help you keep track of your cleaning duties effortlessly.
Physical or Digital? Choose What Works for You
Decide whether you prefer an electronic checklist or a physical one. Some people find it satisfying to check off tasks on paper, while others lean towards the convenience of an app. Whatever your choice, ensure it’s easily accessible during your cleaning routine.
Review and Update Regularly
A cleaning checklist isn’t set in stone. Regularly review and update your checklist based on changing needs or preferences. Seasonal cleaning tasks, such as yard work in the spring or deep-cleaning carpets in the fall, should be added to keep your home fresh and tidy year-round.
Get Inspired
For more insights, tips, and resources about effective cleaning strategies, visit The Cleaning Institute to explore professional advice. You’ll find more ideas that can elevate your cleaning regimen and overall home maintenance.
By following these steps, you’ll find it much easier to maintain a clean, organized living or working space. A comprehensive cleaning checklist enables you to track your progress and ensures that no detail goes unnoticed.
Tips for Writing Clear and Detailed Condition Reports
When documenting the condition of a property, clear and detailed reports can make a significant difference. Whether you are a property manager, a cleaning company, or a landlord, understanding how to write condition reports effectively is essential. Here are some useful tips to guide you.
Be Thorough in Your Assessment
As you walk through the property, take your time and observe everything carefully. Make sure to document every area, including:
- Exterior: Check the lawn, siding, roof, and walkways.
- Interior: Inspect rooms, hallways, and closets for cleanliness and damages.
- Fixtures: Evaluate lights, plumbing, and appliances.
Detailing issues extensively will provide a clear picture of the property’s initial state.
Use Clear Descriptions
Your language should be straightforward and precise. Avoid vague terms like “good condition” or “some dirt.” Instead, be specific:
- “The carpet in the living room has several stains and a noticeable tear.”
- “The kitchen faucet has a small leak, and the sink shows signs of water damage.”
This level of detail ensures anyone reading the report understands the property’s condition without any ambiguity.
Incorporate Photographic Evidence
A picture speaks a thousand words. Including clear photographs of damaged areas or cleanliness levels enhances your report’s credibility. Follow these steps:
- Take pictures of all rooms from multiple angles.
- Zoom in on any specific issues, like stains or scratches.
- Label each photo with corresponding notes for clarity.
This combination of text and visuals will create a comprehensive overview.
Organize Information Logically
Structure your report in a logical format. An effective layout could involve:
- A room-by-room breakdown: Start from one end of the property and move systematically through.
- Highlighting issues: Use bullet points for problems that need attention.
- Basic layout: Include sections for “found issues” and “cleaning requirements.”
Keep your layout easy to follow, which will save time for anyone reviewing it.
Utilize Checklists
Creating checklists can make it easy to ensure you don’t miss anything during your assessment. Here’s a sample checklist template:
| Area | Condition | Notes |
|---|---|---|
| Living Room | Needs Cleaning | Stains on carpet |
| Kitchen | Good | No visible issues |
| Bathroom | Needs Repairs | Leaking faucet |
Using checklists like this not only keeps you organized but also provides a visual reference for the property’s condition.
Follow Up with a Cleaning List
After documenting the condition, outline what needs attention. This could include:
- Cleaning specific areas (e.g., carpets, windows, and bathrooms)
- Repairs that need to be made (e.g., replacing broken tiles or faucets)
- Suggestions for suppliers or services that can assist
A detailed follow-up action plan makes the report even more valuable.
Share Reports Appropriately
Once the report is finalized, ensure it is shared with the appropriate parties involved. Utilize email to send the documentation to property owners, managers, or cleaning services. Consider storing the documents in a cloud service where they can be easily accessed later, keeping a record of any changes or work done over time.
For more comprehensive guides on writing reports, you can check websites like Property Management and Cleaning Business Academy.
These practices will help you create a professional and effective condition report that meets the needs of anyone involved in property management or maintenance. By putting in the effort to document thoroughly, you pave the way for effective communication, ultimately leading to better outcomes for everyone involved.
Understanding the Importance of Documentation in Property Management
Documentation plays a crucial role in property management, serving as the backbone for effective communication and operations. It not only provides clarity but also enhances accountability, ensuring smooth interactions between property managers, tenants, and other stakeholders.
Why Documentation Matters
Having a solid documentation system in place helps property managers maintain order and transparency in their operations. Here are several reasons why documentation is essential:
- Communication: Clear documentation facilitates better communication among team members and between property managers and tenants.
- Record Keeping: Good records help in tracking property maintenance, tenant history, lease agreements, and financial transactions.
- Legal Protection: Proper documentation serves as a safeguard against potential legal disputes. It provides evidence of communication, agreements, and actions taken.
- Efficiency: Streamlined processes improve overall efficiency, allowing property managers to focus on growth and tenant satisfaction.
Types of Documentation in Property Management
Various types of documentation play a pivotal role in property management:
Lease Agreements
Lease agreements are fundamental documents that outline the terms of rental agreements, including duration, rent amount, and responsibilities of both parties. Having clear lease agreements mitigates misunderstandings and helps enforce compliance.
Inspection Reports
Documenting property conditions before and after tenant occupancy is vital. Inspection reports serve as a record of the property’s state, making it easier to address maintenance issues and security deposit disputes. You can explore more on [The Balance Small Business](https://www.thebalancesmb.com) about creating effective inspection reports.
Maintenance Requests
Logging maintenance requests ensures that tenant concerns are promptly addressed. This documentation helps in tracking unresolved issues and maintains a timeline of services provided.
Financial Records
Maintaining financial records is crucial for budgeting, accounting, and tax purposes. Property managers should document income from rents, expenses for maintenance, and any other financial transactions. More insights can be found on [Property Management Insider](https://propertymanagementinsider.com).
Best Practices for Effective Documentation
To maximize the benefits of documentation in property management, consider these best practices:
- Be Consistent: Use standardized forms and formats for all documentation to ensure uniformity. This makes it easier to retrieve and manage documents.
- Stay Updated: Regularly review and update documents to reflect any changes in laws, regulations, or property management practices.
- Utilize Technology: Leverage property management software to streamline documentation processes. Many solutions offer features for document storage, maintenance tracking, and communication.
- Access Control: Ensure that sensitive documents are accessible only to authorized personnel. This includes tenant information and financial records.
The Role of Digital Documentation
In today’s digital age, transitioning to online documentation systems enhances accessibility and reduces physical space for storage. Digital documentation allows for real-time updates and easier sharing among stakeholders.
Moreover, automated reminders for lease renewals, maintenance checks, and payment due dates can significantly improve organization. For insights about digital solutions, visit [Buildium](https://www.buildium.com).
Challenges in Documentation
While documentation is vital, property managers face several challenges:
- Time Constraints: Managing documentation can be time-consuming, especially for busy property managers handling multiple properties.
- Training Needs: Staff must be adequately trained to ensure proper documentation practices are followed consistently.
- Information Overload: Balancing the amount of documentation without becoming overwhelmed can be difficult.
To tackle these challenges, consider developing a straightforward process that allows staff to easily create, access, and manage documents. Engaging workshops for team training can also be immensely beneficial.
Understanding the importance of documentation is vital for successful property management. By creating effective documentation practices, property managers enhance their operational efficiency, improve tenant relations, and lay a solid groundwork for future growth.
Common Mistakes to Avoid When Documenting Property Condition
When documenting property condition, several common mistakes can undermine your efforts. Understanding these pitfalls can help you create an effective record that is reliable and useful. Here are some key errors to avoid when assessing property condition.
Lack of a Comprehensive Checklist
One of the most significant mistakes is not using a checklist. A checklist ensures you don’t overlook any details. Here’s what to include:
- Overall cleanliness of the property
- Condition of walls and ceilings
- Flooring status
- State of appliances
- Windows and doors functionality
- Plumbing and electrical fixtures
This structured approach can lead to a thorough evaluation, which is essential in property management and maintenance.
Failing to Take Clear Photographs
Another common error is not capturing clear, high-quality photographs. Here’s how to ensure your documentation is effective:
- Use natural lighting for better visibility.
- Capture multiple angles of each room.
- Highlight specific areas of concern.
- Date your photos for accurate timelines.
Investing in a good camera or using a smartphone with high resolution can yield impressive results that bolster your documentation.
Inconsistency in Documenting Condition
Being inconsistent in how you document property condition can lead to confusion. Always use the same terms and formats throughout your report. Use detailed descriptions instead of vague terms. For instance:
| Vague Description | Detailed Description |
|---|---|
| Good condition | Walls painted with minimal wear, no major cracks or damage. |
| Bad plumbing | Leaking kitchen faucet with signs of water damage underneath the sink. |
This clarity will help anyone reviewing your documentation understand the property’s exact condition.
Not Keeping Records Updated
Property conditions can change, which is why keeping records up-to-date is crucial. Schedule regular check-ups, especially after significant events like storms or repairs. Maintaining a timeline helps track changes and can be beneficial for future property assessments.
Neglecting to Note Maintenance History
Failing to record the maintenance history of a property can lead to gaps in information. When assessing condition, always include previous repair details, dates, and any warranties associated with the work performed. This practice can prove essential when addressing recurring issues or justifying maintenance expenses.
Ignoring the Importance of Objectivity
It’s essential to remain as objective as possible when documenting property condition. Personal feelings or biases about a property can cloud your judgment. Strive to provide an unbiased overview, focusing on facts rather than opinions. Consider using standardized forms or software that prompts for specific information, helping you stay neutral.
For more information on documenting property conditions and best practices, consider exploring resources such as Property Management Insider and National Association of Realtors.
By being aware of these common mistakes and implementing solutions, you can significantly enhance your property documentation process. It will not only help in managing the property more effectively but also preserve the value and ensure better communication between all parties involved.
Key Takeaway:
Documenting the condition of a property before and after cleaning is essential for property management. This process provides a clear overview of the property’s condition, ensuring accountability and facilitating efficient communication between property managers, cleaning crews, and tenants.
First, it is critical to utilize essential tools for effective property documentation. Tools such as smartphone cameras, measuring devices, and documentation apps can streamline this process. Having these tools at your disposal allows for capturing both visual and written evidence efficiently, making it easier to refer back to specific issues over time.
When it comes to best practices for taking before-and-after photos, lighting and angles play a pivotal role. Ensure photos are taken in good lighting conditions, and consider taking shots from multiple angles to provide a comprehensive view of the property. High-resolution images leave no room for ambiguity, making it easier to spot differences post-cleaning.
Creating a comprehensive cleaning checklist is another key aspect. This checklist should outline all areas that need attention, noting specific stains, damage, or other concerns. By doing this, you can track what was cleaned and highlight any issues that require further attention.
Moreover, writing clear and detailed condition reports enriches your documentation process. Use straightforward language, bullet points, and descriptive terms to convey the state of the property accurately. Clarity here ensures everyone involved understands exactly what condition the property was in before and after cleaning.
Understanding the importance of documentation in property management cannot be overstated. It not only aids in maintaining standards but also serves to protect all parties involved should disputes arise.
Be aware of common mistakes to avoid when documenting property condition. These include neglecting to take thorough photos, failing to keep records organized, and overlooking the inclusion of minor damages that could become significant issues later on. Recognizing these pitfalls helps you enhance your property documentation process for better management outcomes.
Effective property documentation involves using the right tools, following best practices for photography, preparing thorough checklists, and writing precise reports, all while steering clear of common errors. This diligence not only enhances the efficiency of property management but also establishes a transparent relationship with all stakeholders involved.
Conclusion
Documenting property condition before and after cleaning is an essential practice that significantly enhances property management. By utilizing effective tools such as cameras or smartphones for photos, you set a clear visual precedent. Best practices for taking before and after photos ensure these images accurately depict the changes made during cleaning, helping to maintain transparency with tenants or clients.
Creating a comprehensive cleaning checklist assists in streamlining the process, ensuring no detail is missed. When you write clear and detailed condition reports, you provide documentation that is easy to understand, serving as an invaluable resource for future reference. This can boost tenant satisfaction and protect property owners from disputes.
Understanding the importance of thorough documentation in property management allows you to keep meticulous records, which can be crucial in retaining or gaining deposits, resolving disagreements, or making informed decisions about property maintenance. Avoiding common mistakes—such as neglecting specific areas or not labeling photos correctly—will enhance the effectiveness of your documentation efforts.
By following these guidelines and strategies, you will not only improve the overall cleaning process but also foster trust and clarity in your property management practices. Engaging in proper documentation benefits you, your team, and the people you serve, ensuring that everyone has a clear view of the property’s condition—before and after any cleaning task. Remember, effective documentation is not just a task; it’s an investment in maintaining value and quality in your properties.


Leave a Reply